
To create stunning decoupage art, you need to have the right materials. In order to master the art of decoupage, you will require ‘Paper or napkins’, ‘Scissors’, ‘Adhesive’, ‘Paintbrush’ and ‘Sealer’. Each of these sub-sections plays a crucial role in helping you achieve the desired results.
Paper or napkins
When it comes to decoupage, various materials come into play that can enhance the look of a craft item. One such material is a thin decorative layering paper used for covering and embellishing objects, or napkins with printed designs suitable for the same effect.
- One common type of paper used in decoupage is rice paper, which has a translucent finish and lends itself well to layering.
- Tissue paper, on the other hand, is ideal for creating delicate and lightweight layers.
- For those looking to add patterned designs to their work, napkins with beautiful prints can be an excellent choice due to their intricate graphics and patterns.
It’s essential to note that quality materials should be used when working with decoupage. Ensure that the papers selected are resistant to bleeding, easy to apply without leaving air bubbles or wrinkles.
Moreover, the possibilities of using speciality papers like silk paper or mulberry paper are immense as they provide unique textures and finishes that make embellished items stand out.
No doubt there’s so much variety available when choosing decoupage papers or napkins based on theme and mood preferences. In fact, I recall reading about an artist who recycled old newspapers and magazines by incorporating them into her decoupage work – not only helping her produce environmentally-friendly crafts but also adding a rustic touch!
Scissors may seem harmless, but in the hands of a decoupage enthusiast, they become a weapon of mass creation.
Scissors
For the cutting process in decoupage, an essential tool is a pair of cutting implements often referred to as the decorative scissors. These scissors come in different shapes and sizes, including pinking shears, wave-edge scissors, and zigzag scissors. The choice of decorative scissors depends on the desired pattern and style for the project. The following table lists some of the most commonly used decorative scissors for decoupage and their unique features:
| Type of Scissors | Features |
| Pinking shears | Provides a zigzag edge to the paper giving it a unique texture |
| Wave edge scissors | Creates a wavy edge effect also adding texture to the paper |
| Zigzag Scissors | A popular choice for edging paper due to its consistent pattern along with various angle options |
It would be best if you remembered that this list is not exhaustive, and other types could be used for specific projects. Alongside Decorative Scissors, it’s important to mention that normal or plain-edged scissors are also needed for trimming papers accurately. While these tools are fundamental in every decoupage project, remember always to purchase high-quality ones from reputable brands since this will ensure that they last longer. A novice crafter once shared that her first attempt at using decorative scissors left her frustrated since they were low quality and kept coming apart during use. Therefore always invest in good quality ‘cutting’ decorative tools. Don’t worry about glueing that broken heart back together, decoupage has you covered with its powerful adhesive.
Adhesive
To achieve a strong bond in decoupage, a reliable adhesive is crucial. A high-quality, clear-drying glue specially designed for decoupaging is the ideal choice. It should be acid-free, non-toxic and easy to apply with a brush or sponge. Mod Podge is a popular adhesive that dries clear and has different varieties for different surfaces such as fabric, wood or metal.
When selecting an adhesive for decoupage, it’s essential to consider its drying time as well. Some adhesives might take longer to dry than others, delaying the entire process. Additionally, an adhesive that doesn’t wrinkle delicate papers or seep through porous surfaces is preferable.
Remember to apply the adhesive liberally on both the surface and the item to be adhered. Using too little glue can result in bubbles and wrinkles while using too much can cause smudging and staining.
Pro Tip: Always test your chosen adhesive on a small area before applying it on your main project to ensure its compatibility and performance.
A paintbrush is a decoupage artist’s best friend, or worst enemy if you accidentally use the same one for glue and paint.
Paintbrush
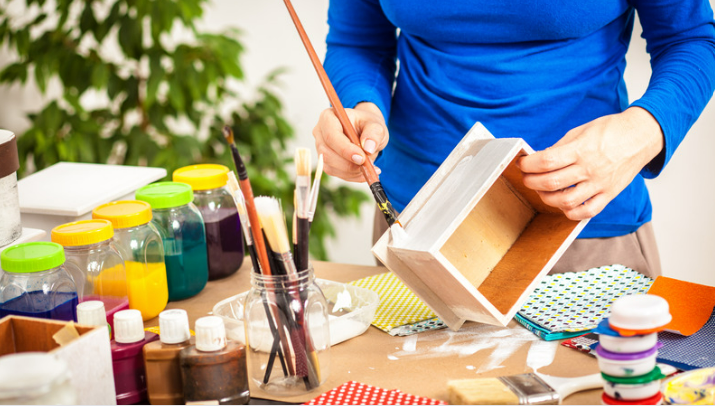
For applying the decoupage technique, a small paintbrush having soft and flexible bristles is an essential tool. This tool allows you to smoothly apply the adhesive on the surface and paste the paper cut-outs with precision.
Choose a brush size that matches your requirements and comfort level. A thin brush tip will provide precise details while a broader one might help you cover large areas quickly. A medium-sized one can be versatile in terms of usage.
Moreover, if you are new to decoupage or have difficulty handling brushes, consider opting for a synthetic fiber brush as it is more forgiving than natural hair ones.
Pro Tip: Clean your brush frequently with warm soapy water while working with different shades of acrylic paints or use different brushes for each color to prevent them from mixing up.
Forget the sealer, just use your tears to bond the paper and save money on materials.
Sealer
To ensure durability and longevity of decoupage craft, a protective layer is necessary. A ‘finishing coat’ or ‘coating agent’ can be applied on the surface to seal the decoupage in place and prevent it from any damage. Below is a table that displays different types of sealers used in decoupage with their unique features and compatibility with different surfaces.
| Type of Sealer | Features | Surface Compatibility |
| Glue-based Sealers | Water-resistant, easy to clean, dries clear | Paper, wood, cardboard |
| Polyurethane Varnish | High gloss finish, scratch-resistant, water-resistant | Wood |
| Acrylic Medium | Adds texture and depth, dries clear or matte finish, can be mixed with paint for custom colors | Canvas, fabric |
| Epoxy Resin Coating | Durable and water-resistant coating, glossy finish | Ceramic tiles |
It is important to choose the correct sealer based on the material you are working with as some sealers may not bond properly or may cause discoloration. In addition to using only a small amount of sealer when applying it to the surface, it is suggested to apply multiple thin coats for better protection. It is also recommended to let each coat dry completely before applying another. Finally, using a quality brush or sponge applicator helps ensure an even application. Keep your decoupage from turning into a soggy mess by waterproofing it – because nobody wants a waterlogged masterpiece.
Is Decoupage Waterproof
To make your decoupage waterproof, the solution lies in using a waterproof sealer or a varnish. You can apply multiple layers of sealer or varnish for added protection, just ensure each layer dries completely before applying the next. In this section, we will also discuss some tips to keep in mind while making your decoupage waterproof, such as avoiding exposing the decoupage to water for prolonged periods.
Use a waterproof sealer
Using an effective waterproof sealer can protect your decoupage from water damage, making it long-lasting and durable. Here’s a quick guide on how to make decoupage waterproof using a waterproof sealer:
- Start by ensuring that the surface of your decoupage is clean, dry and free from any dirt and debris.
- Choose a suitable waterproof sealer for your project based on the type of materials used in the design.
- Apply a thin layer of the waterproof sealer to the entire surface, using a brush or spray bottle.
- Allow the first layer to dry completely before applying a second coat for better protection.
- Repeat this process until you achieve your desired level of protection on the surface.
- Once you finish applying coats, leave it to dry overnight.
While sealing can make your decoupage waterproof, keep in mind that it may slightly alter the texture of some papers and fabrics used in the design.
A Pro Tip is to use acrylic spray sealers as they are ideal for creating a smooth and glossy finish while keeping your decoupage safe and secure from water damage.
You know you’ve applied enough sealer when your decoupage project is ready to weather a storm, or at least a spill from your morning coffee.
Apply multiple layers of sealer
To ensure decoupage is waterproof, applying multiple layers of sealer is crucial. This will protect the design from moisture and other external factors while giving it a glossy finish.
Here are four simple steps to follow when applying multiple layers of sealer:
- Start with a clean surface: Ensure that the surface you’re working on is free from dust, debris, and any other contaminants that might interfere with the sealing process.
- Apply one layer of sealer: Using a brush or sponge, apply an even layer of sealer over the decoupage. Make sure not to overload your brush or sponge as it can lead to bubbles and an uneven finish.
- Allow time for drying: Once you’ve applied the first layer of sealer, allow it enough time to dry before applying another coat. It’s best to wait for at least 30 minutes but check the instructions on your sealant for accurate drying times.
- Repeat steps two and three: Repeat the second and third steps until you have applied several layers of sealer. Generally speaking, three or four coats should be sufficient in making your decoupage fully waterproof.
Unique details about this step include selecting an appropriate type of sealant according to your requirements. Moreover, always stir your sealant thoroughly before using it to avoid clumps.
Applying multiple layers of sealer can make decoupage waterproof, but here are some additional suggestions for added protection:
- Avoid placing your finished product under direct sunlight as UV rays could fade its appearance over time.
- Spray a coat of varnish over your sealed decoupage once every six months if you’d like extra durability.
These suggestions work because varnish acts as an added layer of protection against moisture and UV rays. It can be easily applied by spraying the surface evenly and leaving it to dry for at least 24 hours before use.
Patience is key when decoupaging, so take a break and binge-watch a season of your favorite show while each layer dries.
Let each layer dry completely before applying the next
Applying decoupage is a delicate process that requires perfection in every step. Each layer applied needs to dry completely before you can apply the next coat, or else your precious creation can become smudged. Waiting for the previous layer to dry completely enables the layer to be set well enough, making it ready for adding another coat.
To make sure each layer dries completely before applying the next, follow this six-step guide:
- Apply a thin coat of glue on the surface you want to decoupage.
- Place the cut-out paper gently on top of the wet glue.
- Smooth out any wrinkles or bubbles using a squeegee or your hand.
- Let it dry naturally and avoid using a hairdryer as it may cause wrinkling.
- Repeat steps 1-4 until you’ve achieved your desired thickness.
- Let all layers dry overnight at room temperature before turning over or touching.
Besides waiting between coats, it’s essential to check for spots where the paper is not sticking correctly and fill them out with more glue.
A pro-tip is to use thicker materials like cardstock instead of thinner ones as they tend to get wrinkled during application.
Once upon a time, there was a craft enthusiast who decided to create an exquisite decoupage craft display cabinet but failed terribly due to impatiently jumping into adding layers without letting the previous one dry entirely first. The resulting mess made him realize how crucial patience is when dealing with decoupage art and never repeated that mistake again!
Skip the raincoat, give your decoupage a varnish coat!
Consider using a varnish
Using a coat of waterproof varnish can be an effective way to protect decoupage items from damage caused by moisture. Applying varnish can help seal the surface and prevent water from penetrating the layers of paper or fabric used in the creation of the decoupage item.
Consider using a varnish for making your decoupage waterproof. A table can be created to showcase different types of varnishes suitable for this purpose, their features and benefits. For instance, acrylic-based sealers like Mod Podge Outdoor and FolkArt Outdoor Gloss are excellent options for creating a waterproof coat on your decoupage project.
When applying the varnish coat, ensuring that it is spread evenly over the surface is key to achieving complete protection. A second coat may also be applied after allowing adequate drying time for added protection against moisture damage.
It’s important to note that even with a waterproof varnish coat, decoupage items should not be left submerged in water or exposed to excessive moisture as it may cause damage to the underlying layers visually or chemically.
According to experts at Crafts By Amanda, choosing an appropriate type of sealer or varnish is essential when trying to make decoupage watertight.
Don’t let your decoupage turn into a soggy mess – keep it high and dry like your sense of humour.
Avoid exposing decoupage to water for prolonged periods of time
When it comes to protecting decoupage from water damage, it’s crucial to avoid prolonged exposure to moisture. This is because paper-based materials can easily become saturated and begin to break down, ruining the overall appearance of the project. To prevent this, it’s important to take measures such as using a waterproof sealant or applying a protective coating.
A popular option is to use Mod Podge Outdoor, which is designed specifically for outdoor use and can resist rain and other forms of moisture. Alternatively, you can also try using a spray-on acrylic sealer or even a clear resin that will provide additional protection and durability. Whichever method you choose, it’s important to apply multiple thin layers rather than one thick layer in order to ensure full coverage and avoid any potential cracking or peeling.
While protecting decoupage from water damage is critical to maintaining its integrity, it’s also worth noting that certain activities – such as drinking hot liquids – can cause condensation buildup on surfaces. To prevent this from happening, it may be necessary to use coasters or other protective items when using your decoupaged pieces.
As reported by the Artful Crafter website, using wax paper while doing decoupage allows you to move projects without shifting pieces around or having them stick together.
Decoupage like a pro: remember to seal it tight, or you’ll be crying over your soggy artwork.
Tips for successful decoupage
To achieve successful decoupage with your preferred materials, you need to follow some tips. In order to make it happen, focus on choosing a suitable surface for decoupage, using high-quality adhesive, practising good technique for applying adhesive, maintaining patience while working, and experimenting with different materials and techniques.
Choose a suitable surface for decoupage
When selecting a surface for decoupage, it is important to consider both the material of the surface and its intended use. Choosing an appropriate surface will help ensure that your decoupage remains vibrant and intact over time.
Here are five steps to follow when selecting a surface for decoupage:
- Consider the material- you can choose surfaces made of glass, paper mache, wood, plastic, or metal.
- Choose a smooth and even surface- rough surfaces may cause bubbles or wrinkles and ruin the decoupage.
- Ensure that the surface is clean and dry before starting- oils, dirt, or grease can cause adhesion problems while moisture can cause bubbles.
- Know the intended use of your item – different items have different usage requirements e.g., coasters need to withstand moisture regularly.
- Consider adding primer base if needed, properly applying paint layers to prime the surface.
It is worth noting that some materials may require additional preparation like sanding or treating with gesso.
Selecting a suitable surface enhances not only durability but also aesthetic appeal during any decoupage project. When choosing your next project paint exemplary bases following the tips above.
Last year I got commissioned by my friend who wanted me to come up with unique wine glasses in their winery which would stand out amongst other standard glasses for his clients. I suggested using decoupage technique as they wanted something colorful that implies modern touch instead of being too classic since wineries were evolving from being old-fashioned.Accordingly, we decided to design few prototype glasses based on our theme description- floral patterns with color bight accents- on white painted wine goblet bases suitable for hand holding comfortability and fitting client aesthetics successfully completing our desired innovation goals!
Your decoupage is only as strong as the bond you share with your high-quality adhesive.
Use a high-quality adhesive
Choosing the right adhesive is crucial in decoupage. An apt and superior quality adhesive provides the perfect grip for the paper and ensures longevity of the decoupage craftwork.
Here is a 4-step guide to help you choose and use a high-quality adhesive:
- Look for adhesives specifically designed for decoupage or paper crafting.
- Consider water-based, non-toxic, acid-free and clear drying adhesives.
- Measure the amount of adhesive required depending on your project size as too much or too little can affect the outcome.
- Apply a thin layer on both surfaces, let dry slightly until tacky then carefully place and smooth out the paper onto your surface ensuring no air bubbles are present.
It’s important to note that glue consistency varies by brand; hence it’s essential to select what works best for your project.
Moreover, opt for an adhesive that does not warp or yellow over time. Such yellowing could ruin the desired aesthetic of your artwork.
Incorporating these tips into your decoupage process can result in impressive outcomes. Don’t miss out on creating beautiful crafts with high-quality adhesives. Your work will last longer with a professional look!
Don’t be glueless in your decoupage pursuit, use proper technique and stick with it.
Practice good technique when applying adhesive
When applying adhesive for successful decoupage, it is important to utilize proper technique. Follow these three steps to ensure adhesive application is effective and visually appealing:
- Thin and Even: Use a foam brush to apply an even layer of adhesive on the surface. Ensure that the layer is thin as thick layers can lead to bubbling and wrinkles.
- Work in Sections: Begin from one corner and work in small sections, ensuring all edges are smooth.
- Paper Placement: Once the adhesive has been applied, carefully place the paper onto the surface with gentle pressure from the center outward.
To improve the adherence of your decoupage project, use a primer before applying adhesive to avoid peeling over time. This will allow for a smoother final appearance without any cracks or detachment.
A study conducted by The Journal of Creative Behavior showed that individuals who engaged in decoupage projects reported higher levels of stress relief and self-esteem.
Decoupage is like a puzzle, so take your time and don’t force it – unless you want your project to look like a Picasso.
Be patient and take your time
To achieve flawless decoupage, it is essential to invest your time wisely. Rushing can lead to sloppy and uneven results. So, be consistent in your techniques and take the necessary steps to ensure your project achieves the desired outcome.
When working on decoupage projects, exercising patience is crucial. Impatience can disrupt the process and ultimately ruin the final product. Hence, it is always recommended to plan every step of the project, work slowly and take breaks when needed to maintain composure.
To avoid damaging your work or losing progress, don’t rush the drying process between layers. If you’re completing a multi-layered project, have patience as each layer requires adequate drying time before moving on to the next one.
Remember that there’s no need to hurry – take your time for a more impeccable result.
I know someone who was trying desperately to finish their decoupage project before a family event but couldn’t finish on time due to rushing through it. The person ended up with an unpleasing result and regretted not putting enough effort into planning and careful execution of their project.